Sunday, March 07, 2010

Sugar Plum Thrums


Or, "Toe-Up Toe Socks for Toe Shoes"

Pointe Shoes hurt. There are no two ways about it. When I danced I padded my shoes with fluff and soft found objects. I wrapped my toes and wore Toe Socks. Toe Socks were the cut off heads of old socks who had lost their mates.
My preferred padding Before & After

Sugar Plum Thrums are the best of two worlds. They fit snuggly into the shoe and keep the padding from traveling down to the toe. The majority of the padding is placed over the knuckles. There is none at the back of the foot.
These Toe Socks are so comfy cozy you may not want to take them off. Well, maybe just to admire them.
The fleece padding makes the sock take the shape of a pointed foot. So cute!

This pattern follows the formula for two knitting mainstays; Toe-Up Socks and Thrummed Mitts. The instructions are written to appeal to dancers and Mums of dancers who may not be used to knitting these items.

Parents note: I know what I'm talking about. I studied ballet for many years at both R.A.D. and Cecchetti credited schools. My feet would have been flat but for my early start in dance and as a result pointe work was a bit more difficult for me. These Toe Socks would have been a boon!


Materials:
Sock or Fingering Weight Yarn -approx. 100m
-Lucy Neatby's "Celestial Merino Dream" Superwash merino shown.
2.5mm double pointed needles (DPNs) set of 5.
Two Handfuls of Fleece. The type is not important, but if you have a choice, go for a sheep breed with a long staple (long hairs).

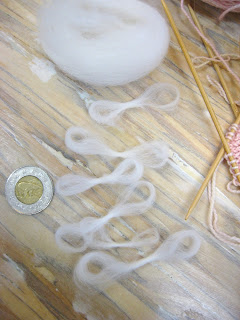
Make Thrums ahead of time. Twony for scale.

Interweave has a good guide to making thrums. Refer to photos in this pattern for size. I advise making a whole bunch of thrums in one go. It is annoying to get into the swing of your knitting and then have to pause to make a thrum.
Interweave also has a good tutorial for knitting the thrums into your work.

The instructions for rows with thrums are written as follows:
(example)
4. (row number)
K1, Thrum, K2, Thrum, K1 (instructions for stitches on dpn #1)
K1, Thrum, K2, Thrum, K1 (instructions for stitches on dpn #2)
Knit (instructions for stitches on dpn #3; knit every stitch)
Knit (instructions for stitches on dpn #4; knit every stitch)

Inc: Knit into the stitch below, then knit the stitch. Knitpicks has a tutorial on this increase here.

Pattern:
Cast on 8 stitches over two DPNs using the Figure 8 method (easier) or Judy Becker's Magic Cast On (nicer:link).
Knit 2 rows on these two dpns.
Photo shows simple figure 8 cast on

1. Divide as follows:
With a new dpn, inc, K3 (1st dpn has 5 stitches)
With a new dpn, K3, inc (2nd dpn has 5 stitches)
With a new dpn, inc, K3 (3rd dpn has 5 stitches)
With a new dpn, K3, inc (4th dpn has 5 sitches)
20 stitches total, over 4 dpns.

2.
K2, Thrum, K2
Thrum, K2, Thrum, K1
Knit
Knit

3.
Inc, knit to end
Knit to last stitch, inc
Inc, knit to end
Knit to last stich, inc
(6 sts on each dpn)


The Thrums count as stitches. The next row will be an increase row.
4.
K1, Thrum, K2, Thrum, K1
Knit
Knit

5. Work as for row 3 (7 sts on each dpn)

6.
K3, Thrum, K2, Thrum
K2, Thrum, K2, Thrum, K1
Knit
Knit

7. Work as for row 3 (8 sts on each dpn)

8. Knit each stitch in round.

9. Work as for row 3 (9 sts on each dpn)

10.
K3, Thrum, K2, Thrum, K2
Thrum, K2, Thrum, K2, Thrum, K2
Knit
Knit

11. Work as for row 3 (10 sts on each dpn)

12. Knit each stitch in round.

13. Work as for row 3 (11 sts on each dpn)

14.
K3, Thrum, K2, Thrum, K2, Thrum, K1
K1, Thrum, K2, Thrum, K2, Thrum, K3
Knit
Knit
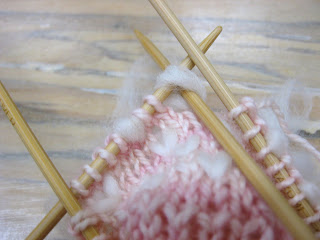

Knit into the thrums as if they were normal stitches. Give the fleece a tug after you knit into the thrumed stitch.

15. Work as for row 3 (12 sts on each dpn)

16. Knit each stitch in round.

17. Work as for row 3 (13 sts on each dpn)

18.
Thrum, K2, Thrum, K2, Thrum, K2, Thrum, K2, Thrum
K2, Thrum, K2, Thrum, K2, Thrum, K4
Knit
Knit

Here ends the thrumming section.
Note that there are no thrums on the back side.

19. Knit each stitch in round.

20-22
K2, P2 rib
*You may choose to slip the last stitch of the 1st dpn to the 2nd dpn and the 1st stitch of the 4th dpn to the 3rd dpn to make the ribbing easier to manage.

Cast off in rib pattern.
Turn inside out. Weave in ends and give all thrums a sharp tug downwards.
Now Bourrée.

Sunday, February 14, 2010

Vintage Valentine's


I would blush too with a be-piped young man looking at my bottom.

-Mitt Pattern from Stitchcraft Magazine 1964

Thursday, February 11, 2010

Mrs. Crawford, Post-Edwardian Bossy Boots?


In Needlecraft Magazine March 1916, Mrs. P. L. Crawford wrote
Probably, in the wide range of crocheted designs, there is no more popular motif than the grape-and-leaf, of which there are many variations.
While this may have been true in 1916, it is not true one hundred years later and I for one think that's a shame.
Shall we bring back the grape-and-leaf for 2016? Oh lets.

Mrs. Crawford offered 2 collars, I am making collar 1. She suggests that by altering the recommended 40 thread to a finer or coarser silk or cotton, the collar may be used as garnitures or trimming all over the place including the waist. She says that using a colour that harmonizes with your gown is "extremely pretty", but that "ecru thread may be substituted with pleasing results."


I'm using white DMC #12 thread and a steel 0.75mm hook. The pattern is using many interesting and amusing techniques.
The medallions are started as a row of half flowers, much like an edging. In fact, I think they would make a lovely edging, ending the pattern at row one.

I've never encountered a motif constructed like these medallions are. They really highlight my doily top tip which is very hard to word.

When double or treble crochets are needed in isolation, or if a cluster is to be worked from a chain alone it is doubly important, when working the first stitch to raise the hook perpendicular to the work to ensure that each yarn over and loop is as high as the previous stitch or loop. It's akin to Lucy Neatby's Happy Stitches in knitting. If a stitch does not have a neighbour standing next to it, it is want to lean over or even flop. In crocheted motifs and doilies, this may make the excess thread pop out the bottom. Very unattractive.

You may need to estimate the height of the first step or stitch, but as long as you yank up your hook with each of the next loops or steps of the stitch, you will have a consistent and convincing look.

The hook perpendicular to the work brings the current stitch (in this case one leg in a cluster) level with both the previous stitches and the chain. The chain is pulled to it's full length to help determine the height of this stitch.

What I enjoyed the most about this pattern was Mrs. Crawford's bossy but charming finishing instructions:

"All joinings were done with needle and fine thread, the writer believing this to be the better method for many reasons."

Delish! Absolutely no justification! She also gives a collar top tip;

'Have a collar-pattern and, after placing the motifs as arranged, or in any preferred way, sew with fine stitches."

Aren't patterns from this era nice in their flexibility (the joinings bit notwithstanding). I like the room these instructions give for personal taste and creativity. I also admire this period's approach to garnitures; instructions seldom assume what you're going to use the pattern, or even the item for. Indeed:


Why Not?


Monday, February 08, 2010

Lindsey Buckingham Crochet Model?


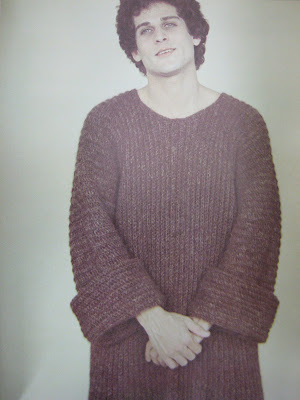
"Modular Crochet- A Revolutionary New Method for Creating Custom-Design Pullovers" (1978)by Judith Copeland is an amazing read. If you ever get your hands on it don't let go. It mainly contains ladies pullovers and tops and is beautifuly photographed in turn of the '80s period style.

Wow, YouTube has changed. I didn't know I wouldn't be able to find Buckingham's first music video (though 'Bwana' on SNL would be better). At least I know how to sing "Trouble" in Spanish now.
Lindsey photos from my personal stock.


By the way, I know that the man in the sweaters is not really Lindsey Buckingham. I just think it's funny. Please lets not have another Elsie Tanner/Pat Pheonix/Glove Model debacle.

Sunday, January 31, 2010

The Fall of Love?

Knits in the Fall and Winter of 1967


Textures and Paillettes seem to have been the mode. I like the Bobble Dress and Bobble Wimple/Hood.

Monday, January 25, 2010

A Tale of Two Cardigans


Or, "A Lesson in Gauge"


I special ordered Twinkle’s first book right when it came out. I had it in Kingston in 07. I wanted to make the Best Friend Cardigan straight away. It was IMPOSSIBLE to get the yarn. I could not find any of the subs the book suggests, except for Rowan Big Wool which I could not find more than 50g of. I really wanted to make myself one of these little cardigans that are just a little more than a spencer and a little less than a viable jacket.
LB Wool Ease Thick and Quick claims to be a ‘super bulky’ yarn and, despite knowing in my heart of hearts that I did NOT have gauge, I sallied forth thinking I was just adding drape and openness with my inappropriate 15mm circular needles.

What a mess.

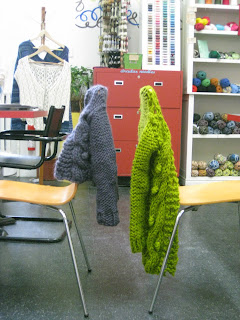
Obviously this cardigan is enormous.
The real problem I have with this sweater is the horrible position the pattern’s construction puts you in. Come time for finishing, this pattern's instructions would have you seam at every opportunity. Why, when the book's materials suggestions are so very important to follow, (in terms of yarn at any rate) would the fair MsTwinkle have us buy circular needles and not knit things circularly? Naively, I followed the instructions and knit everything flat. Stupidly, I used the yarn, full ply, to seam with. With such a big gauge all the shaping is visible and any decrease looks like a K10tog or something.

Frankenstein Arms

The cardigan really shouldn't’t have so much seaming in it. Seaming at a big gauge is coo coo and if you didn’t find a nice fluffy yarn to knit this with (something that is really 2.5st/1” with no gaps). it will be like trying to discreetly mattress stitch double yarn overs together.

I made this cardigan again, using the right yarn. The results were shocking. The cardigan produced by Twinkle yarn is a miniature version of this giganto Grandpa Cardi and illustrates, like nothing else I have ever encountered how vitally important gauge swatching is. You must swatch. You must swatch for each stitch pattern. That said, using the correct materials, I still had to make adjustments. link:
http://pomoboho.blogspot.com/2009/12/my-twinkle-bfc-and-i-fs-but-not-bffs.html
I have many tips and gaffs to share.


In the end, I like the grungy look of this. Also it’s lived-in vibe. Do I like these laboured photos of it? Yes. Do I wear it out? No.
This is the same Cardigan.

Thursday, January 21, 2010

Event Updates

Time for an Update, I should think.

The Loop is holding a fundraiser for Haiti Disaster Relief. Knitters are invited to donate yarn from their stash and then to come in and buy from someone else's stash this weekend ( January 23rd and 24th) Proceeds going to the Canadian Red Cross Haiti Disaster Relief Fund. We've been receiving great stuff. There will be a raffle, advice for donations, and general good feelings.
Non-Knitters are invited too. "Darning for Dollars" will be on all weekend to help mend your worn out woolens. Your $10 donation will help mend overseas. Bring in your holey socks or snagged sweaters for us to fix...we can teach you to mend as well! Gentlemen and Needle-phobics encouraged.
I think it should be good fun and promote warm feelings in and out.
Find out more at The Loop's website http://www.theloophalifax.com

While there, check on two upcoming classes; Intro to Crochet and an Amigurumi Crochet Workshop.
I am trying something new with the Intro Class. Project orientated classes always work best and I've tried many different patterns in the past. I'm now going with a Sampler Scarf. Most of the Stitch Patterns are comprised of cleverly placed single crochets and I, myself was shocked with the many textures and patterns that came about with just a little experimentation.
It's a great exercise for any crocheter and frankly, nothing beats a Sampler.

The Amigurumi class is one we've never run as a workshop so it will be fun to see how many different animals and characters we can produce round the table.


I'm also lending my hook to the Lunchtime Enrichment Program at Le Marchant St Thomas.
Parents please note:
Sessions are every Tuesday lunch starting February 2.
Materials will be provided, but favorite colours and bits and pieces from home are welcome. We will be crocheting, but will also try spinning our own wool! Kids will be able to produce results after the first lesson and will learn about where the yarn we use comes from.

As in previous years a blog has been created to recap each session as it takes place and to cover any new techniques we learn. Each technique will be videotaped from the Crocheter's perspective for easy translation to hands. Although there is no 'homework' for this program, students will be able to use the blog to perfect any tricky stitches or catch up from home.
This blog will be private, uses no names, and the web address will be given to each student (along with this web address) at the first session.

I am always available here at my personal blog for questions or concerns; just leave a comment (these are private). I may also be tracked down at The Loop at 1547 Barrington St on Thursdays and Sundays. We'd love to see you...maybe someone else in the family is a bit of a yarnie, or would like to revamp their skills?

Related Posts Plugin for WordPress, Blogger...