
The world of LYS and craft merchants is a small one, especially in a place like Nova Scotia. There is a lot of back and forth referring, often beyond the purview of our individual shops.
I often send people off into the welcoming arms of other local and localish yarn stores when a customer needs a yarn we don't cary. Every Sunday, I have at least 2 customers visit or phone looking for a range of things we don't carry at all....and never would.
Needlepoint and Rug Hooking supplies are the most common requests I cannot fulfill. Sewing and Quilting supplies are close behind. Of course, once in a while I have a desperate call for beeswax, pipe cleaners, artificial flowers, garment bags, and once, a Sombrero sized for a Teddy Bear. I refer these quests on as best I can, but over the years I've amassed a list of craft suppliers. It's a list that doesn't seem to exist anywhere but under our stapler at The Loop.
Downtown Halifax has a distinct circuit that crafty people take to find their supplies:
DeSerres (AKA 'The Creative Marketplace', formally Loomis & Toles)
Maritime Hobbies & Crafts
Feroz Beads
Black Market (leather, hemp, you never know)
Dustjacket Books and Treasures (Second Hand and Vintage Craft Books)
Jennifer's of Nova Scotia (Cross Stitch and Knitting kits, Finished knitted items)
Love,Me Boutique
NSCAD Student Supply Store
Dollarama/Buck or Two (you never know)
Yarn Stores seem to have a louder presence than other types of craft stores in Nova Scotia. The average customer will have already found her way to places like L.K. Yarns, Gaspereau Valley Fibres or Have A Yarn (to name Just a few).
Here are some suppliers to whom I often refer customers. These shops fill some rather large gaps in HRM's crafting needs:
Highland Heart Hookery
www.hookarug.com
23 Chartwell Lane Halifax, NS B3M 3S7
(902) 445-4644
Dennison's Custom Framing (Embroidery and Needlepoint)
www.dennisonscustomframing.com
626 King St Bridgewater, NS B4V 1B4
(902) 543-0486
The Beading Room
www.thebeadingroom.com
An online store based in Fall River N.S. The Beading Room offers several different options for delivery.
Hands Across Time Rug Hooking
2526 Hwy #368 R.R. #1. Pugwash Junction. NS. B0K 1M0.
Tel: (902) 257-2267.
Email: handsacrosstime@yahoo.ca
This is by NO means a link list of Maritime Craft Shops and Suppliers. Many friends and neighbouring businesses may be found on The Loop's link page. I would love to hear how this week's Sunday shoppers fared!
Showing posts with label Tips and Techniques. Show all posts
Showing posts with label Tips and Techniques. Show all posts
Monday, February 06, 2012

Wednesday, February 01, 2012
Repairing Fair Isle with a Felting Needle
A horrible thing has happened in my joke of a closet. What I have to assume was a gang of moths, infiltrated my walk-in and declared a wooly corner, next to my duct tape judy, their territory. Somehow, some sort of sticky thing (likely a slow melting hard candy or cough drop) challenged the moth's turf, and when the dust settled, neither the jets nor the sharks were the victims...my fair-isle sleeves were.

This is a hibernating project, but still one close to my heart. The sleeves were worked circularly, as one unit, and then steeked twice, to separate the two flat sleeves. They were also decreased into pleats, but that's another story.
The sleeve that had sat on top had two problems; stains of hard but powdery stuff, and many tiny bites. If you find yourself in this shameful position, consider my method:

First, I tried to soften the brittle stains by dabbing with a moist cloth. Where the stain ran into raw ends, exposed by bites, I frayed them and roughed them up until the powdery substance was gone. This also got rid of any fibre that was going to dislodge later, anyways.
I then began to needle felt from the back. I looked for stash fibre that roughly matched the main colour in the area.


From the front, I carefully needle felted without adding new fibre, to lock the work in place.
I then took cuttings from the steek of those colours most in trouble. I needle felted these in place, working from the front and then securing in the back, turning to the front once more to clean things up with the felting needle.

I was able to cover some areas almost as if I were swiss darning. In areas of a recessing colour or of a larger colour block I didn't worry about following the path of each stitch quite so much.

While the felting needle and block were out, I experimented by felting the pleats into place.

I had never tried this before, but the results were fairly convincing. It is also another good reason to steek when possible! As you can see, I use a crochet steek. The critters had been there as well, so the troubled sleeve was coming away from the crochet in places. I squished the perpendicular crochet and knit stitches together and needle felted along the join.

That's probably a good idea too, even outside of wartime. I sometimes worry about a crochet steek holding, depending on the yarn employed. While I usually reinforce with hand sewing; backstitches with a doubled thread, from now on I may turn to needle felting if reinforcing is necessary. I think it is a good solution for stranded projects worked in Cascade 220 in particular. The larger gauge doesn't always support traditional steeking methods and of course the wool lacks a Shetland wool's stickiness. It is, however, a prodigious felter!
I do a lot of stranded projects in Cascade 220, but this has more to do with availability. The Loop's shipment just arrived and the heathered colours are beautiful. As always, I will have to buy one skein of each new colour. I think of 220 as Pokemon a little bit.
Saturday, January 28, 2012
Choosing & Placing Knitted Shoulder Pads
Here are some examples of effects created by Gauge Swatch Shoulder Pads. These pads are generously stuffed; remember that the thickness or fullness of the pad is up to you. The pad shapes shown here are Square,
Triangular,
and Rectangular.
Read about how to make your own shoulder padding from gauge squares here. It is worth noting that the effect of the Rectangular pad is similar to that achieved with Sleeve Head Rolls.
1.
A Square pad tacked to both the shoulder seam and the inside of the sleeve head, rounding the shoulder line and supporting the apex of the puff.


A Square pad placed halfway down the neck (at about the bra strap) so that half of the pad projects beyond the natural shoulder.The pad is sewn along one side, crossing the shoulder seam, with the inner corners tacked to the front and back of the garment. The free edge of the pad is weighed down by the sleeve, taking the shape of the puff. The seam of the pad, because it is located further down the neck avoids added height but still has a military feel.


A Triangular Shoulder Pad with the fold (the longest side) attached to the shoulder near the centre top of the shoulder seam. The point of the triangle is left free floating to take the shape of the puff. With an overstuffed pad such as this one, a kick-up shoulder line can be achieved.

 (My favorite!) A Triangular Pad with the centre point attached to the shoulder. The folded side projects into the head of the sleeve, and dictates the end of the shoulder line.
The sleeve follows the shape of the top of the pad and then falls in a clean vertical drop. This is a good way to give structure to a drapey or lacy knit.


 A Rectangular pad attached to the shoulder at the sleeve seam with the long seamed edge pointing up into the puff. The fullness of the sleeve is kept aloft by the pad's seam. This is suited to a twin set because of the seaming difficulties. The determined could tack the lower corners to a bra strap or a under shirt to prop up a knitted jacket.
 The outer edge of the shoulder line is supported for a softer war time look.


 Use a seamless join like mattress stitch or grafting at the top shoulder seam in preparation for this type of padding.
Use a 3 needle bind off if you plan on using modern, store bought shoulder pads; the ridge created by the seam will provide a spine useful for stitching the centre of pads to the sweater.
You are reading "The Quest For Puff" ©Morgan Forrester
Triangular,
and Rectangular.
Read about how to make your own shoulder padding from gauge squares here. It is worth noting that the effect of the Rectangular pad is similar to that achieved with Sleeve Head Rolls.
1.

A Square pad tacked to both the shoulder seam and the inside of the sleeve head, rounding the shoulder line and supporting the apex of the puff.

2.

A Square pad placed halfway down the neck (at about the bra strap) so that half of the pad projects beyond the natural shoulder.The pad is sewn along one side, crossing the shoulder seam, with the inner corners tacked to the front and back of the garment. The free edge of the pad is weighed down by the sleeve, taking the shape of the puff. The seam of the pad, because it is located further down the neck avoids added height but still has a military feel.

3.

A Triangular Shoulder Pad with the fold (the longest side) attached to the shoulder near the centre top of the shoulder seam. The point of the triangle is left free floating to take the shape of the puff. With an overstuffed pad such as this one, a kick-up shoulder line can be achieved.

4.


The sleeve follows the shape of the top of the pad and then falls in a clean vertical drop. This is a good way to give structure to a drapey or lacy knit.

5. A Rectangular Pad attached to the shoulder at the centre of the pad's long seam. Small stitches tack those inner corners to the front and the back of the garment.
A Rectangular Pad attached to the shoulder at the centre of the pad's long seam. Small stitches tack those inner corners to the front and the back of the garment. 
The folded edge of the pad extends the shoulder line and supports the fullest part of the puff sleeve.The outer edge of the shoulder becomes rounded.

6.
A Rectangular pad attached to the shoulder at the sleeve seam with the long seamed edge pointing up into the puff. The fullness of the sleeve is kept aloft by the pad's seam. This is suited to a twin set because of the seaming difficulties. The determined could tack the lower corners to a bra strap or a under shirt to prop up a knitted jacket. The outer edge of the shoulder line is supported for a softer war time look.
A Final Note:
 Use a seamless join like mattress stitch or grafting at the top shoulder seam in preparation for this type of padding.
Use a 3 needle bind off if you plan on using modern, store bought shoulder pads; the ridge created by the seam will provide a spine useful for stitching the centre of pads to the sweater.
You are reading "The Quest For Puff" ©Morgan Forrester
Up next:
Padding Vintage Sweaters with Sleeve Heads
Coming Soon:
Vintage Sleeves: Puff Pleating
Vintage Sleeves: Seaming for Puff
Creating Puffed Sleeves Anew
Tuesday, January 17, 2012
Vintage Pattern Photos with Shoulder Pads
Here are some examples of Vintage Pattern Photos that put Shoulder Pads to good use:


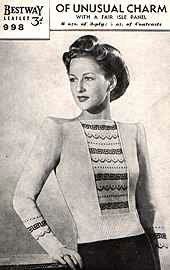

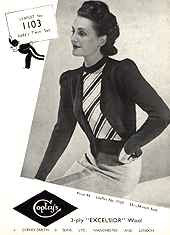
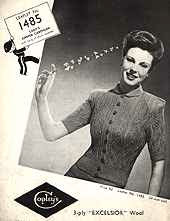
Another kick-up shape. Any kick-up shoulder pad, whether it is a pad or layered, angled sleeve head, needs to be customized and carefully placed. In this case most of the shaping comes from the fabric type and pleating. The padding supports, rather than creates the shape.


You are reading "The Quest For Puff" ©Morgan Forrester
This post is a part of The Quest For Puff Series. Read it from the beginning HERE.

This shape can be supported by a kick-up pad. If you cannot find this style of shoulder pad consider using shaped sleeve heads or a rolled pad.
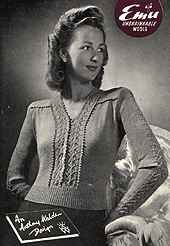
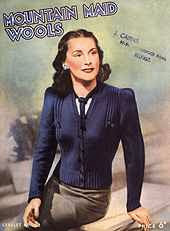
In this pattern photo you can clearly see the edge of the shoulder pad. It appears to be shaped like modern women's wear 'coat pads'. It features a steep increase from the inner to outer edge, and lets the sleeve hang straight down below the modest puff.

A roll or long rectangular pad (see gauge swatch pads) should be used when the sleeve seam sits this far from the neck and the puff extends the shoulder line.

The line of this 1950s shoulder is improved by a round pad. Although the welt features drastic shaping (presumably full fashioned increases) the sleeve and shoulder are very basic. The pad creates the shape and adds drape to the heavy fabric. This is the kind of 'figure enhansing' padding that Dior re-introduced.

Another kick-up shape. Any kick-up shoulder pad, whether it is a pad or layered, angled sleeve head, needs to be customized and carefully placed. In this case most of the shaping comes from the fabric type and pleating. The padding supports, rather than creates the shape.

To support the apex of this folded puff sleeve, a triangular pad or a modern shoulder pad. trimmed to shape should work. When the shoulder line is extended to this extreme, consider stitching the pad so that the greater portion of padding is free of the shoulder. Try flipping a triangular pad so that the point sits at the centre of the sleeve to shoulder seam, and that the long side sits at the edge of the shoulder.

Without some sort of pad a cardigan or any kind of second layer would flatten a delicately puffed sleeve jumper. In this example the pad would most likely have been knit as a small rectangular (almost square) pillow, stuffed with fleece or maybe sawdust. A clever home knitter might have used her gauge squares!

Remember that a sturdier knit may not require a shoulder pad. Often, a dense or thick fabric can support it's own puffed up weight, so long as it has been properly gathered or pleated before seaming into the armseye.

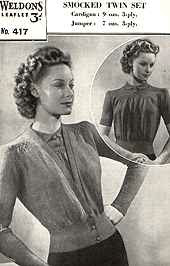
This pattern photo clearly shows the outline of a shoulder pad. It is shaped much like todays shaped pads and is a handy reference for padding placement. It will have been stitched down the centre spine, with small tacking stitches taken at the two side points of the pad, securing it to the front and the back of the sweater.

'For When You're Off Duty ' is an uncommonly accommodating pattern. The pattern includes direction of a custom shoulder pad. Despite the dense fabric created by pleating the firm 1x1 ribbing of the sleeve, this elongated shoulder line would not stay aloft without it's padding.
You are reading "The Quest For Puff" ©Morgan Forrester
Up next:
Choosing & Placing Knitted Shoulder Pads
Coming Soon:
Vintage Sleeves: Puff Pleating
Vintage Sleeves: Seaming for Puff
Creating Puffed Sleeves Anew
This post is a part of The Quest For Puff Series. Read it from the beginning HERE.
Monday, January 16, 2012
Shoulder Pads & Puff Sleeved Sweaters

There's no need to sit like that; a good shoulder pad will keep your puff in place!
Shoulder pads in the 30s/40s were a very different beast. They were not the Velcro disks that we immediately think of in a post 1980s world.
Pads
Sleeve Heads (Shaped and Rolled)
Supports

This is of no help to the home knitter.
You must click HERE to watch on youtube proper.
Watch on Mute! This is (clearly) not the original soundtrack.
Watch on Mute! This is (clearly) not the original soundtrack.
Shoulder Pads are best suited to structural puff sleeves. Puffed, or full sleeves that have been folded or pleated into the seam benefit most from this style of padding. Military, kick-up, and elongated shoulder lines from the late 1930s up until the introduction of the New Look in 1947 were supported by shoulder pads and should be now. The hand knitter working from patterns in this era would have taken this extra step for granted.
Know which look you're going for by reading Puffed Sleeves in the 1930's and 1940's.
Many Vintage Patterns include directions for knitted pads to be sewn to the inside of the sweater. A good example may be found in the V&A's collection: "For When You're off Duty". This little pad is more like a cushion; knit of jumper yarn (sock yarn is a good substitution) and stuffed to your taste. It rests on the shoulder and supports the apex of the puff. Make your own as you would a cell phone cozy. Two squares or rectangles sewn together, or one folded in half and seamed will do. For a softer, pre-war look, you may choose to make your pad out of two triangles rather than rectangles which have a more masculine feel.
Read 'Using Gauge Swatches as Shoulder Pads in the Vintage Style' for more on knitted padding.
Read 'Choosing & Placing Knitted Shoulder Pads' for further guidance.
Today, ready made shoulder pads may be purchased at most fabric stores. These objects are more like the power suit boosters we are used to. For Knitters' use they will most likely need to be trimmed. For this reason I do not recommend buying vinyl pads. Good companies provide different pads for different sleeve shapes i.e. Raglan, Dolman. The pad is sewn to the garment through the center, creating a spine for the pad. Baste this spine and try on the sweater. Working from the outside, still wearing the sweater, take small stitches with the sweater's yarn (de-plyed if necessary) to anchor the pad in place, or for heavy yarns, sewing thread.
For an extreme vintage look I recommend a "coat pad" (a pad used in coats) with a 1" thickness. For a blouse vs. a sweater a 1/2" thickness may be more appropriate.
The looks which large pads can provide depend entirely on their placement, so a great deal of experimenting will be needed. It is best to do this while wearing the garment, whenever possible. If trimming is necessary, use a fabric marker to note cuts while holding the pad on your shoulder (with a friend or a mirror).

This vinyl pad is not what we want. Note the centre stitching along the pad, attaching it to the shoulder seam. We do want this.
Ready to wear Shoulder Pads tend to come in white, nude or black. If none are available in an appropriate shade for your project they may be covered. For a nude look try using old nylons to cover a pad.
For an outrageous shoulder la Joan Crawford or House of Balmain, consider layering 2 or more pads. Baste them together through the centre spine, and then cover the pad using loose stitches or feather stitches and cover with fabric or nylons. This is a great technique to use if you can only find 1980s styled flat pads.
American football comments be damned!
Generally these kinds of paddings can be made at home with little sewing experience. With a reliable sewing store in your area though, you may find it easier to purchase ready-made padding, and then alter it at home. Pads may be opened up at the seam and the amount of wadding can be adjusted. You may choose to add or remove bulk, or you may decide to push the stuffing to one side or the other, depending on your sweater style or body type. If you are layering sleeve heads or pads use large feather stitches. If you are layering fibrous padding stuffs, experiment with spray adhesives. If a large shoulder pad's slope is to wide for your shoulder or if you have a petite shoulder line, cut your pad in half. Trim as necessary, adjust the angle on your own shoulder, and then reattach the front and back of the pad using a baseball stitch. Remember that few bodies are symmetrical, so treat each pad, each knitted piece, and each shoulder separately.
Click HERE to see examples of Vintage Sweater Pattern Photos that put Shoulder Pads to good use.
You are reading "The Quest For Puff" ©Morgan Forrester
Up next:
Choosing & Placing Knitted Shoulder Pads
Coming Soon:
Vintage Sleeves: Puff Pleating
Vintage Sleeves: Seaming for Puff
Creating Puffed Sleeves Anew
This post is a part of The Quest For Puff Series. Read it from the beginning HERE.
Saturday, October 08, 2011
Using Gauge Swatches as Shoulder Pads in the Vintage Style
Even before rationing made reusing and recycling wool necessary, clever knitters were repurposing their gauge swatches (tension squares) as shoulder pads. A swatch can be made into several different styles of pad. We'll be looking at three: triangular, square, and rectangular.

NOTE: The average swatch is knit to 10cm (4"). The examples in this tutorial are each of 24 stitches; a neat display device I tried at The Loop. These swatches were of various worsted weight yarns resulting in 18-22 stitches per 4 inches. The average size of swatch was 5" square.
Because they were for display purposes, each swatch was knit with a garter stitch border 3 stitches on either side and 3-4 rows top and bottom. This is an excellent format for a swatch destined to become padding. The garter border allows for easy stitching and stuffing, and also creates an ideal flat surface for placement and stitching to the garment, particularly useful if the pad is to be removed or used in multiple applications. These worsted weight swatches make a big statement but for a more subtle look, use a fine yarn. The point of this technique is that you will have already made the pads by swatching for your project, and since most of your vintage sweaters will have been knit with a fingering or sport weight yarn your pads will be less cartoony than my examples.

Triangles/1930s
As we know, shoulder pads first became necessary to the home knitter in the 1930s so that the shoulder line could be extended gracefully, and girlish puff sleeves could stay aloft. The first shoulder pads were triangular, a perfect job for the typically square gauge swatch.

Place these stitches in from the edge. The stitches in the photo were placed in the middle stitch of the 3row/3 stitch Garter border. This works to about .25" from the edge. If your swatch does not have a border like the example pad does, place your seam .5" in from the edge. This will create a ridge you can use to attach the pad to the garment.

Stop stitching your pad together an inch or so before the second corner. Use this opening to stuff your pad. Do not cut your working yarn or unthread your needle.
You have several stuffing options. I stuffed the examples above with raw fleece, but only because it was the easiest thing to hand. Polyfilla, cotton baton and fluff will do just as well. Followers of Make do and Mend may take a tip from WWII and fill their pads with scraps of waste yarn....or even sawdust.
Note: If you are using flat sheets of wadding you should cut these to the shape of your swatches, leaving a .5" seaming allowance along the sides to be stitched. In the case of a triangular pad this means that along the third side the wadding should reach the fold of the swatch. In a square pad you will need to leave a seam allowance along all four sides. You will layer the filler to taste, depending on the thickness of the wadding, but start with just one layer.
Whichever material you choose, resist the urge to overstuff.
Pick your needle back up and finish stitching, closing the stuffing gap, and backstitch to secure. To finish, bury your yarn by inserting the needle into the pad and stuffing and bringing up through the middle of the pad's fabric as pictured further down. Now clip the yarn close to the surface.

Squares/1940s
Square shoulder pads are made in much the same way and will thrill knitters of 1940s patterns. In the sweater patterns of the 40s we see instructions for shoulder pads start to crop up and although some of them are unique to a single sweater, most are simple bean bags of the same yarn as the main pattern. Remember that under WWII's military influence pads were required to both extend the shoulder line, and raise it. In more extreme puffed sleeves, the sleeve head would be totally unsupported but for padding. This is one reason for disappointing, deflated puffs in home knitting.

In this example the two swatches are of slightly different sizes. This is almost always likely to be the case, and it doesn't really matter for this project. Simply pin the two squares together so that the edges match. The centre of one of the swatches will bulge, but that's what we want anyways.

Don't overstuff the square pad either. The amount of filler in the photo above was a good starting point; you may find that you need less padding than you thought. Remember that placement of the pad is going to be very important. Extreme vintage looks are created when the shoulder pad is stitched in. Overstuffing will actually give you less options and control.

A sticky material like raw fleece will tend to ball up in the middle. We want an even stuffing so use your fingers to distribute the filler evenly.

Bury your yarn as pictured.

A single square can also be made into a rectangular pad by folding a swatch in half and stitching. In my knitting I find this to be the most useful pad. The truth is, it has a bit more in common with another type of padding; a 'sleeve head' or 'roll'. This is because its short sides will follow the curve of the shoulder and support the front and back of a round puff. The term sleeve head is problematic! Read more about this in the intro to this padding series:here.
The rectangular gauge swatch can afford to be stuffed generously. The most important aspect to this pad for knitters, is the top seam. If your swatch does not have a garter stitch ridge remember to place your stitching well away from the edge. Along the long sides of the rectangle sew at least .5" in, creating a flat strip. This is what you will use to attach the pad to the garment.

This post is a part of The Quest For Puff Series. Read it from the beginning HERE.
Friday, August 05, 2011
The Quest For Puff: Introduction
Or, "Morgan's Puff Piece"

"Well, I hope she'll be satisfied at last, for I know she's been hankering after those silly sleeves ever since they came in, although she never said a word after the first. The puffs have been getting bigger and more ridiculous right along; they're as big as balloons now. Next year anybody who wears them will have to go through a door sideways."
-L.M. Montgomery,Anne of Green Gables, Chapter XXV: "Mathew Insists on Puffed Sleeves".
I'm a direct descendant of one of the first Scottish families to settle on Prince Edward Island, so perhaps it is in my blood. Like Anne Shirley, I think that puffed sleeves are the living end. I like any number of shaped sleeves and try to incorporate these looks into my knitting. If the search
terms resulting in a visit to this blog are to be believed, then I find myself in good company.
In the continuing quest for nicely puffed sweater sleeves, most of us have become jaded. No puff is great enough. Full sleeve heads, gathered at the top are not satisfying us. Neither are increases placed near the beginning of top down raglans. Most of us are knitting vintage sweater patterns from the 1930s ,'40s and '50s.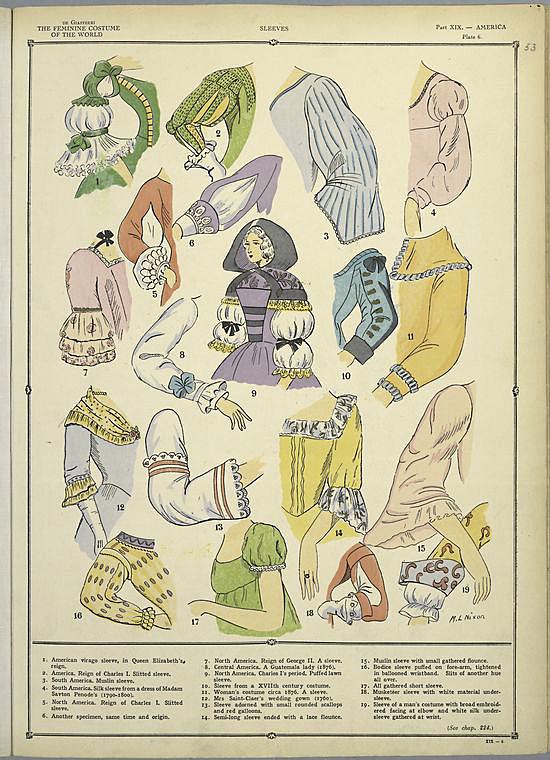
"The History of the Feminine Costume of the World, From the Year 5318 B.C. to Our Century"
Paul Louis de Giafferri, 1926-27
Shoulder shapes differ from decade to decade but there are distinct looks specific to each of these eras. Not everyone loved a puff then either, but those who did were passionate. It is an over simplification to ascribe one puff to a single period...but I will.
As I understand it, 'vintage' knitters are interested in recreating the puff sleeves of the
1930s Click Here
1940s Click Here
and the peasant inspired puff of the 1950s-70s. (Coming Soon)
Aside: If you are interested in Victorian styles of puff, I recommend using 1980s patterns for the modern sleeve shaping and finishing guidelines. Look for sweaters baring a descriptive pattern with specific sleeve and sleeve setting instructions. The New Romantic patterns of the '80s and early '90s show good examples of late 19th century sleeves. Start there, but be warned; they will use heavier gauges.
Why I'm Puffed Up About This:
There is a misconception out there that people want to knit vintage patterns, but want to make them look modern.
This is not where I am coming from.
If I choose a pattern from say, 1943, it is because I want the look, feel and silhouette of 1943. De puffing the sleeves or adjusting the welt (or making the jumper baggy!?!) in my eyes, defeats the purpose.*
Indeed, if I choose to knit a puffy sleeved vintage pattern it probably means that I want my shoulders as big as possible and for my fit to be exaggerated.
*My purposes are petite and costumy, I do realize.
There is a misconception out there that people want to knit vintage patterns, but want to make them look modern.
This is not where I am coming from.
If I choose a pattern from say, 1943, it is because I want the look, feel and silhouette of 1943. De puffing the sleeves or adjusting the welt (or making the jumper baggy!?!) in my eyes, defeats the purpose.*
Indeed, if I choose to knit a puffy sleeved vintage pattern it probably means that I want my shoulders as big as possible and for my fit to be exaggerated.
*My purposes are petite and costumy, I do realize.

The Designing Women were not the Fashion Harpies that Mature Knitters think they were.
I assume that this notion of deflating the sleeves of old patterns is fueled by some real anti-puff bias. Most knitters hate volume in the shoulder area. They hate the idea of padding in the shoulder area more. Perhaps it is borne of having been a little bit older than I was in the 1980s. I grew up with shoulder pads, but never wore a power suit. Indeed, once they were out and my Mum un-velcroed the pads from her jackets, blouses and sweaters, I was fond of stuffing my bra with them.
Many modern patterns, should they contain any degree of puff are met with cries of "Ack!! Puff? I already have shoulders, thank you very much" and "Uh, do I want to look like a Football Player?"
Let me assure you that even with Balmain styled shoulder pads I could never look like an American Football Player, and if you are interested in knitting vintage sweaters, chances are nobody will mistake you for one either.

Many modern patterns, should they contain any degree of puff are met with cries of "Ack!! Puff? I already have shoulders, thank you very much" and "Uh, do I want to look like a Football Player?"
Let me assure you that even with Balmain styled shoulder pads I could never look like an American Football Player, and if you are interested in knitting vintage sweaters, chances are nobody will mistake you for one either.

I'm not sure who this Gentleman is.
Padding the Problem:
That out of the way, let me also add that sometimes even vintage patterns that look great in the photo let me down in the end. The photos in these patterns seem to promise either fullness level with the ears, or sleeves that jut out high, then drop as suddenly as a cliff face (as scaled by Joan Crawford and the like).
Of course there is no reason to think that the same 'styling' skullduggery so common place in today's photo shoots wasn't being utilized in the 1930s and 40s. If we could go back in time to the Stitchcraft studios I am sure we would find ladies with backs lined with bulldog clips (to cinch in excess fabric) and most importantly, we would find a whole bunch of foreign objects holding up the sleeve at the shoulder. Of course these patterns assume that you will construct some kind of pad or sleeve head (that's another post), but these photos belie more help than those cushions could possibly provide on their own.
Link: Making Authentic Vintage Pads & Padding (Coming Soon)
When it's Still a Deflating Experience:
Often, in re-knitting vintage garments the sleeves are a limp disappointment, particularly in those vague patterns that provide no finishing instructions. The puff is in the finishing. There are several alterations and techniques that can be applied to the sleeve at the end of the knitting to enhance puff. In this way, you can re create a pattern faithfully and still achieve your own interpretation of the look.
Link: Setting the Sleeve to Increase Puff (Coming Soon)
I will also describe pads, rolls and sleeve heads. These can be bought or made and altered to achieve a custom look.
Of course all of these techniques can be applied to modern patterns. The difference is the reluctance many of us have towards fiddling with a vintage pattern. This predilection could be romantic, or it could be the fact that as these patterns are vague, it is impossible to predict just what it is that you're fiddling with. This was the case when I knit 1938s "It Cannot Fail To Please", for example. Read it here.
I will try to write about working puff into modern patterns in another post. It will deal with more substantial, structural changes, and to alterations made to the knitting itself.
A separate article will talk about designing puff sleeves and the shoulder shaping needed to accommodate them.

Get Ready To Puff It Up!
Subscribe to:
Posts (Atom)


