Showing posts with label Finished Project. Show all posts

Monday, April 18, 2011

My Art Deco Sweater


I designed this using my Duct Tape Judy. I didn’t realise that she has broader shoulders than I.

photo courtesy NSCAD, Halifax

After months of depression I concluded that without the heart to reknit the arm and shoulder shaping, I would have to fiddle. Call it a nod to Make Do & Mend. The shoulders are cinched in using a twined length of the project yarn (Inca Gold from Berroco) tied in bows. I like it for now; it's so very period. I may try this trick on old cashmere sweaters that are maybe a little too big. No shoulder pads were used which was a bit of a disappointment as I'm writing a epic tutorial on puffs and padding.


The stitch pattern was found in Barbra Walker’s Second Treasury; “Fancy Chevrons”. The slip stitch pattern uses garter stitch bumps which really show off the yarn. It has a sheen to it and shows texture well.

Although I made up the body, the sleeve shape was lifted and reworked from “When Your Off Duty”, a jumper from the V&A’s war-time pattern collection.


photo courtesy Victoria & Albert Museum, originally published in Woman's Weekly July 1943

Reworking the '40s instructions from a 4ply jumper weight to a modern worsted weight yarn, with gauge given without a row gauge and for a lace stitch pattern, where I was using a ribbed section of the pattern made charting these sleeves a puzzle but, I have to admit, pretty fun.


A ribbed sleeve is a mysterious thing, especially when a puff or peak is intended. If I do re-knit the shoulder/armseye, then I will treat the head of the sleeve properly. It should be blocked and set into shape, perhaps over a lightbulb, and it may need to be supported by padding.


Thursday, November 04, 2010

Hilda Ogden


Who doesn't love Jean Alexander's Hilda Ogden? Even Lord Larry Olivier was a member of her fan club. In fact, he founded the Hilda Ogden Appreciation Society. Her iconic scarf and rollers make me swoon with all the ignorance of post-war youth. Somewhere between Rosie the Riveter and Joan Crawford comes this modern take on a 1940s headscarf, modernized into an easy to wear headband. It is very quick and easy to knit.
The expansive rib is worked in Brioche Stitch, a great yardage extender and a very warm knit.
You may omit the provisional cast on by gathering the cast on edge with the tail when finishing. Do try the provisional cast on though; it's important to 'start as you mean to go on'!


Materials:
1 skein Jill Eaton Minnow Merino yarn (Available at The Loop, Halifax)
6mm Knitting Needles
Large eye Darning Needle or 3.5mm Crochet Hook

Yarn Substitution:
Minnow Merino is an aran weight yarn. It is a soft bouncy one ply. One 50g skein contains 70 metres. This project takes less than one skein. A heavy worsted weight yarn may be substituted.


Pattern:
With 6mm needle work
Provisional Crochet cast on with slippery, contrasting, dk or lighter weight scrap yarn.
Cast on 14 stitches.
Note: the original headband, shown in photos was worked with a cast on of 12 stitches. Over time it's width didn't hold up. A cast on of 14 provides a more utilitarian headband for Northern climbs and oceanside cities like mine.

Knit one row with main yarn leaving a 8" tail .
With Main Yarn, begin Brioche Stitch.

Brioche Stitch:
Row 1 (Foundation Row): *yo, sl1pw, k1* Repeat from *to* to the end of the row.
Row 2: *yo, sl1pw, k2tog* Rep *to* to the end of the row.
Repeat Row 2 for pattern.

Continue Brioche Stitch until headband measures 19" from cast on, or until the headband fits around head, slightly stretched.
Final Row: *K1, P1, drop yarn over of previous row* Repeat from *to* to the end of the row.
Leave stitches on needle and cut yarn leaving 8" tail

Rip out provisional cast on
Note: If you have substituted a dissimilar yarn, or a an acrylic yarn, the stitches may not remain pert and ready for pickup once exposed (as in the photo below). If you have floppy stitches prone to unraveling, you may choose to rip out the provisional cast on 'as you go' or to catch up the live, exposed stitches on the needle.


Thread cast on tail through cast on stitches
Thread cast on tail through cast off stitches and pull fairly taut
Thread cast on tail back through cast on stitches, keeping taut.
Thread cast off tail through cast on stitches and cast off stitches, keeping taut.

Weave cast on tail through a few of the cast off stitches and then hide end in the ribbing.
Weave cast off tail through a few of the cast on stitches and then hide end in the ribbing.
Admire.
Blocking is optional but may help to exaggerate the drawn-in effect


Thursday, October 14, 2010

Pinwheel Pillow


This classic crochet project is very pomo. It's also totally The Loop. Our store in Downtown Halifax, Nova Scotia sees my business partners and I, in turn, perched on quite a hard little bar chair for most of the day. It seemed silly not to try and create our own pillow, and I have always wanted to stitch one of these nostalgic pinwheels. I was surprised that I could not find a pattern, even amongst my vintage books and pamphlets, so I reverse engineered a pattern from a 1970s pinwheel pillow I had in the house. I didn't much care for what I ended up with. This new pattern is modernized with simplified shaping. It is also streamlined by omitting one feature; most of these cushions, in decades passed, were worked with a hard circular centre covering the join, much like the centre of a flower. With this new pattern it is no longer necessary to cover the centre join. I think it looks much more modern this way. It's comfier too. I have included instructions for a centre though, in case you're feeling nostalgic.
There are also optional finishing instructions for 'couching' the pillow.

This pattern was designed for The Loop and directions can be found on their Free Pattern Page, as a pdf file. Post your projects on Ravelry and see other crocheters' results.


This is the Colour Sequence I finally set upon for the store's pillow. I used my good friend Cascade 220 wool. The colours are inspired by The Loop. If you would like to use your own sequence, I suggest trying The Random Stripe Generator. Of course, you could just dive in, changing colours when you feel inspired to do so. Don't forget that you can change the number of colours used to amazing effect, and that this project is a great stash buster; just change yarns when you run out of each colour.

Biscuits & Jam's Random Stripe Generator can be found here. I use it all the time. I find it difficult to come up with colourways and sequences that look random. Mine always look laboured. What I really like about the online stripe generator is that it not only shuffles colours, it allows you to program in a range of rows over which the colours are spread. I asked for a sequence for 6 colours with rows ranging from 1 to 4 rows. The pillow could be worked with as little as 2 colours to amazing effects. Of course a hard candy inspired pinwheel would be striking as well.
Questions or Comments? PM me on Ravelry, or post a comment here (you don't need a login to do so). If you are in the Halifax area and want to try this, or any of The Loop or Pomoboho patterns drop by the store. Sundays are always good.

Wednesday, May 12, 2010

It Almost Failed to Please.

"It Cannot Fail to Please" is a pattern that was originaly published in Woman's Weekly magazine in 1938. It has been republished twice. In 1972 it appeared in it's original format as part of Jane Wallen's A Stitch in Time. It is also included in the new Stitch in Time alongside a new, "modern" version of the pattern. I used the original pattern.

Although a total pain in the butt, it is not uncommon for patterns from this era to gloss over finished measurements or to only offer one size . I sallied forth and trusted in the skinnyness of the model.
The pattern called for "Grenock", a 3-ply Super Fingering (which was apparently hard to get even in '38) and No.10 and 13 needles. I substituted Zitron's Trekking Pro Natura, a fine sock yarn, and used vintage needles in the same sizes. I almost always use sock yarn with vintage jumper patterns. It's a good substitution for 'jumper weight' yarn. If a pattern calls for 4-ply, I use a heavier fingering weight. Bottom line, I substitute according to gauge. Often times a vintage pattern will give gauge over a pattern repeat. Sometimes the gauge will be over stockinette and so extra gauge swatches must be made (but that's another post).
I enjoyed knitting this firm but lacy fabric very much. Unfortunately, once I was done and had blocked, I knew it was going to be way too big on me (okay, I knew before that). I didn't much mind; the point had been to recreate this sweater as it would have been. Typically, there were next to no finishing instructions in the original pattern, so I seamed the sides and shoulders the way I usually do. A little fiddling was needed because the lace pattern made the edges wave in and out on it's own. To tailor it to myself, I put on the seamed sweater (a vest at this point). Using mattress stitch I cinched in the sides. Imagine those Mad Magazine comics that had you fold in the sides, A meeting B, so that a new image appeared.
Then there were the sleeves.

Really, the sleeves were the whole point of the sweater for me. I wanted them to puff as they do in the original pattern's photo and, although I am not adverse to shoulder pads and padding, I wanted to see if I could make them puff on their own, unsupported.
That said, I didn't want to change the way that the sleeve was knit. I knit them true to pattern but did use the smaller, ribbing needles to cast off very tightly. I left a very long tail of Trekking. I then pleated the tops of the sleeves and sewed these folds in place using the tail. I also seamed the arm ribbing with the cast on tail.
I tried the vest on at this point, sliding the sleeve up my arm. I played with placement and found that for the kind of puff projection that I wanted I needed to attach the head of the sleeve not to the armseye, but to the side of the neck edging which is square and worked in garter stitch.

Not only did this place the puff early and high on the shoulder, it also allowed the puff something firm and stable (the garter stitch) from which to project. In a puff sleeve the most important section is the very head of the sleeve and the section to which it is attached. In a lacy sweater it can be hard to avoid deflated puffs; the fabric just isn't strong enough to stand up it's own.
After sewing down the pleated section, which was determined by the sleeve's various rates of decrease, I lay the sweater out and eased the sleeve out so that the bottom of the sleeve hit the body at the right place. I tacked this in place.
The sides of the sleeve now lay on top of the sides of the front and back sides of the sweater. Using the same mattress stitch technique I used to tailor the sides, I attached the sides of the arm to the sides of the sweater, matching lace motifs as closely as possible.
I have extra fabric on the inside now, but as the yarn is so fine and the fabric lacy, it didn't really add bulk.
In my experience xs or vintagey sized jumpers can have very tight arm bands.
I recommend blocking the ribbing on the arm if you have thicker upper arms like me. Do not block the bottom body band ribbing. The nipped in waist of these sweaters are responsible for a big chunk of their charm.
After doing all this I decided I had better sit down and write a post about puff sleeves. Then it turned into a tutorial. Then an article with tutorials, then a series of articles with background, silly drawings and tutorials.
I feel the need to take a stand against puff nay-sayers. I couldn't look like an American football player, or a muscle man if I tried. I think the de-puffing of vintage patterns is a crying shame and that anti shoulder pad fury is misplaced.
Stay tuned.

Sunday, March 07, 2010

Sugar Plum Thrums


Or, "Toe-Up Toe Socks for Toe Shoes"

Pointe Shoes hurt. There are no two ways about it. When I danced I padded my shoes with fluff and soft found objects. I wrapped my toes and wore Toe Socks. Toe Socks were the cut off heads of old socks who had lost their mates.
My preferred padding Before & After

Sugar Plum Thrums are the best of two worlds. They fit snuggly into the shoe and keep the padding from traveling down to the toe. The majority of the padding is placed over the knuckles. There is none at the back of the foot.
These Toe Socks are so comfy cozy you may not want to take them off. Well, maybe just to admire them.
The fleece padding makes the sock take the shape of a pointed foot. So cute!

This pattern follows the formula for two knitting mainstays; Toe-Up Socks and Thrummed Mitts. The instructions are written to appeal to dancers and Mums of dancers who may not be used to knitting these items.

Parents note: I know what I'm talking about. I studied ballet for many years at both R.A.D. and Cecchetti credited schools. My feet would have been flat but for my early start in dance and as a result pointe work was a bit more difficult for me. These Toe Socks would have been a boon!


Materials:
Sock or Fingering Weight Yarn -approx. 100m
-Lucy Neatby's "Celestial Merino Dream" Superwash merino shown.
2.5mm double pointed needles (DPNs) set of 5.
Two Handfuls of Fleece. The type is not important, but if you have a choice, go for a sheep breed with a long staple (long hairs).

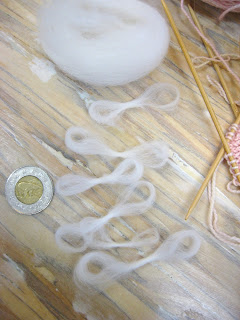
Make Thrums ahead of time. Twony for scale.

Interweave has a good guide to making thrums. Refer to photos in this pattern for size. I advise making a whole bunch of thrums in one go. It is annoying to get into the swing of your knitting and then have to pause to make a thrum.
Interweave also has a good tutorial for knitting the thrums into your work.

The instructions for rows with thrums are written as follows:
(example)
4. (row number)
K1, Thrum, K2, Thrum, K1 (instructions for stitches on dpn #1)
K1, Thrum, K2, Thrum, K1 (instructions for stitches on dpn #2)
Knit (instructions for stitches on dpn #3; knit every stitch)
Knit (instructions for stitches on dpn #4; knit every stitch)

Inc: Knit into the stitch below, then knit the stitch. Knitpicks has a tutorial on this increase here.

Pattern:
Cast on 8 stitches over two DPNs using the Figure 8 method (easier) or Judy Becker's Magic Cast On (nicer:link).
Knit 2 rows on these two dpns.
Photo shows simple figure 8 cast on

1. Divide as follows:
With a new dpn, inc, K3 (1st dpn has 5 stitches)
With a new dpn, K3, inc (2nd dpn has 5 stitches)
With a new dpn, inc, K3 (3rd dpn has 5 stitches)
With a new dpn, K3, inc (4th dpn has 5 sitches)
20 stitches total, over 4 dpns.

2.
K2, Thrum, K2
Thrum, K2, Thrum, K1
Knit
Knit

3.
Inc, knit to end
Knit to last stitch, inc
Inc, knit to end
Knit to last stich, inc
(6 sts on each dpn)


The Thrums count as stitches. The next row will be an increase row.
4.
K1, Thrum, K2, Thrum, K1
Knit
Knit

5. Work as for row 3 (7 sts on each dpn)

6.
K3, Thrum, K2, Thrum
K2, Thrum, K2, Thrum, K1
Knit
Knit

7. Work as for row 3 (8 sts on each dpn)

8. Knit each stitch in round.

9. Work as for row 3 (9 sts on each dpn)

10.
K3, Thrum, K2, Thrum, K2
Thrum, K2, Thrum, K2, Thrum, K2
Knit
Knit

11. Work as for row 3 (10 sts on each dpn)

12. Knit each stitch in round.

13. Work as for row 3 (11 sts on each dpn)

14.
K3, Thrum, K2, Thrum, K2, Thrum, K1
K1, Thrum, K2, Thrum, K2, Thrum, K3
Knit
Knit


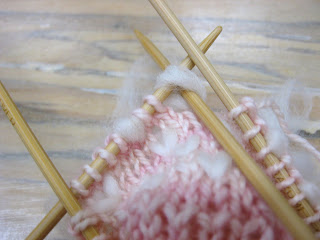
Knit into the thrums as if they were normal stitches. Give the fleece a tug after you knit into the thrumed stitch.

15. Work as for row 3 (12 sts on each dpn)

16. Knit each stitch in round.

17. Work as for row 3 (13 sts on each dpn)

18.
Thrum, K2, Thrum, K2, Thrum, K2, Thrum, K2, Thrum
K2, Thrum, K2, Thrum, K2, Thrum, K4
Knit
Knit

Here ends the thrumming section.
Note that there are no thrums on the back side.

19. Knit each stitch in round.

20-22
K2, P2 rib
*You may choose to slip the last stitch of the 1st dpn to the 2nd dpn and the 1st stitch of the 4th dpn to the 3rd dpn to make the ribbing easier to manage.

Cast off in rib pattern.
Turn inside out. Weave in ends and give all thrums a sharp tug downwards.
Now Bourrée.

Monday, January 25, 2010

A Tale of Two Cardigans


Or, "A Lesson in Gauge"


I special ordered Twinkle’s first book right when it came out. I had it in Kingston in 07. I wanted to make the Best Friend Cardigan straight away. It was IMPOSSIBLE to get the yarn. I could not find any of the subs the book suggests, except for Rowan Big Wool which I could not find more than 50g of. I really wanted to make myself one of these little cardigans that are just a little more than a spencer and a little less than a viable jacket.
LB Wool Ease Thick and Quick claims to be a ‘super bulky’ yarn and, despite knowing in my heart of hearts that I did NOT have gauge, I sallied forth thinking I was just adding drape and openness with my inappropriate 15mm circular needles.

What a mess.

Obviously this cardigan is enormous.
The real problem I have with this sweater is the horrible position the pattern’s construction puts you in. Come time for finishing, this pattern's instructions would have you seam at every opportunity. Why, when the book's materials suggestions are so very important to follow, (in terms of yarn at any rate) would the fair MsTwinkle have us buy circular needles and not knit things circularly? Naively, I followed the instructions and knit everything flat. Stupidly, I used the yarn, full ply, to seam with. With such a big gauge all the shaping is visible and any decrease looks like a K10tog or something.

Frankenstein Arms

The cardigan really shouldn't’t have so much seaming in it. Seaming at a big gauge is coo coo and if you didn’t find a nice fluffy yarn to knit this with (something that is really 2.5st/1” with no gaps). it will be like trying to discreetly mattress stitch double yarn overs together.

I made this cardigan again, using the right yarn. The results were shocking. The cardigan produced by Twinkle yarn is a miniature version of this giganto Grandpa Cardi and illustrates, like nothing else I have ever encountered how vitally important gauge swatching is. You must swatch. You must swatch for each stitch pattern. That said, using the correct materials, I still had to make adjustments. link:
http://pomoboho.blogspot.com/2009/12/my-twinkle-bfc-and-i-fs-but-not-bffs.html
I have many tips and gaffs to share.


In the end, I like the grungy look of this. Also it’s lived-in vibe. Do I like these laboured photos of it? Yes. Do I wear it out? No.
This is the same Cardigan.
Related Posts Plugin for WordPress, Blogger...