Saturday, January 28, 2012

Choosing & Placing Knitted Shoulder Pads

Here are some examples of effects created by Gauge Swatch Shoulder Pads. These pads are generously stuffed; remember that the thickness or fullness of the pad is up to you. The pad shapes shown here are Square,
Triangular,
and Rectangular.
Read about how to make your own shoulder padding from gauge squares here. It is worth noting that the effect of the Rectangular pad is similar to that achieved with Sleeve Head Rolls.

1.

A Square pad tacked to both the shoulder seam and the inside of the sleeve head, rounding the shoulder line and supporting the apex of the puff.

2.
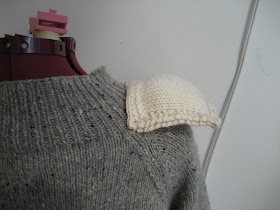
A Square pad placed halfway down the neck (at about the bra strap) so that half of the pad projects beyond the natural shoulder.The pad is sewn along one side, crossing the shoulder seam, with the inner corners tacked to the front and back of the garment. The free edge of the pad is weighed down by the sleeve, taking the shape of the puff. The seam of the pad, because it is located further down the neck avoids added height but still has a military feel.

3.

A Triangular Shoulder Pad with the fold (the longest side) attached to the shoulder near the centre top of the shoulder seam. The point of the triangle is left free floating to take the shape of the puff. With an overstuffed pad such as this one, a kick-up shoulder line can be achieved.

4.
(My favorite!) A Triangular Pad with the centre point attached to the shoulder. The folded side projects into the head of the sleeve, and dictates the end of the shoulder line.
The sleeve follows the shape of the top of the pad and then falls in a clean vertical drop. This is a good way to give structure to a drapey or lacy knit.
5.A Rectangular Pad attached to the shoulder at the centre of the pad's long seam.  Small stitches tack those inner corners to the front and the back of the garment.
The folded edge of the pad extends the shoulder line and supports the fullest part of the puff sleeve.The outer edge of the shoulder becomes rounded.
6.
 A Rectangular pad attached to the shoulder at the sleeve seam with the long seamed edge pointing up into the puff.  The fullness of the sleeve is kept aloft by the pad's seam.  This is suited to a twin set because of the seaming difficulties.  The determined could tack the lower corners to a bra strap or a under shirt to prop up a knitted jacket.
The outer edge of the shoulder line is supported for a softer war time look.


A Final Note:
Use a seamless join like mattress stitch or grafting at the top shoulder seam in preparation for this type of padding.
 Use a 3 needle bind off if you plan on using modern, store bought shoulder pads; the ridge created by the seam will provide a spine useful for stitching the centre of pads to the sweater.
You are reading "The Quest For Puff" ©Morgan Forrester

Up next:
Padding Vintage Sweaters with Sleeve Heads
Coming Soon:
Vintage Sleeves: Puff Pleating
Vintage Sleeves: Seaming for Puff
Creating Puffed Sleeves Anew

Wednesday, January 25, 2012

Canadian Women's Roll in War 1939 - 1940

Women's Role In War Remains Feminine One Here
BY MURIEL ADAMS
(Canadian Press Staff Writer)
Toronto, Jan. 25

These are full days for the typical Canadian woman. If she isn't knitting pullovers or sewing pneumonia jackets for the Red Cross Society, she is filling a "ditty" bag for sailors, giving alternate Sunday evenings to entertain the air force at suppers or doing special war duties assigned by her own club.
Since 1914 women have won greater freedom---the right to vote, the opportunity to take their place beside men in all professions -but so far in Canada their field of war duty is purely a feminine one-knitting, dewing or nursing.
When war broke out 25 years ago there were a few national women's organizations such as the National Council of Women, the Imperial Order of the Daughters of the Empire, and the Victorian Order of Nurses, where women were taking an active part in public problems. Their total membership was less than one-third what it is today.
Women's war efforts were more unified when war began in September. A national drive for registration of women's qualifications for service in national emergencies was already under way. Then machinery started to collect all available offers from coast to coast. These revealed thousands of workers with experience in munition and textile factories, as translators, canteen workers and nurses, who were anxious to give their services.

Ready for War

Remembering the distress caused by the influenza epidemic that followed the first Great War, women all over the country enrolled in home nursing and first aid courses, prepared to go over-seas or work in their own communities.
First major war effort was the sending of tons of clothing and blankets to evacuated children in England. Canadian women over-seas banded together under the direction of Mrs. Vincent Massey, wife of the Canadian high commissioner, and organized the distribution of these supplies and attended to Canadian war work developing on their side of the ocean.
New Red Cross Branches, I.O.D.E. chapters and St. John Ambulance units sprung up in every province. Troop canteens and recreation rooms were opened in most of the large cities and military districts by women's organizations. Sewing groups met in churches, homes, schools and downtown offices to work in their spare time for the men in uniform.


-The Calgary Herald, Thursday January 25, 1940

Monday, January 23, 2012

Sunday in the Store With Morgan

*a Parker who loves the 4 Georges?

It is officially winter in Halifax, and when the wind blows at Salter and Barrington Streets it is bitterly cold.  On a Sunday however, The Loop is toasty warm.  Sometimes it is downright hot.  Often, at Noon, I have to crack the back window a little, which shocks and confuses the amorous pigeons who rendezvous on our sil.
I took this photo outside of DeSerres, where I was waiting for a cab.  15 minutes later I flagged one down.  I had always been told that in Halifax, you can't flag a car.  My Cabbie told me that this isn't true when it comes to Barrington Street!  News to me.

 This Sunday I spent Embroidering.  It's easy to pick up and put down as the need arises, and it's too too convenient having our supply of DMC floss so close to hand.
I also took advantage of our huge storefront window.  Over the years I've used countless transfer methods to get embroidery patterns and my own sketches onto cotton and linen.  I've used lightboxes, carbon paper, various papers, pens and pencils and ironing methods.  When it comes down to it, I don't think anything beats scotch tape, a sharp pencil, and a sunny window.
I do advise photocopying the pattern twice; one copy will be taped to the window underneath the fabric, and the other will be taped alongside, as a reference.  I also recommend drawing four crosses on the fabric, tracing each corner of the pattern or pattern paper.  This way, if you need to retrace, you can orient the fabric perfectly.


Clover needles and notions have arrived!
I'd like to thank all those customers who understood that for me to do the oft-procrastinated job of sorting and pricing the needle shipment, and then printing out our tiny price stickers I need to 
A:  Say the prices and item codes aloud, and
B:  Listen to cartoons on youtube playing underneath the inventory windows.  Totally Spies, Disney's Recess and of course, The Emperor's New School are helpful.  
You are very understanding.  It must be a shock to hear a sudden 'Hiya! Ya!' or 'This Whomps' before I remember to switch the audio over to yarn shopping music.
Enjoy the 4 Georges:


Who ever could have guessed that I'd develop a thing for George II?!

Tuesday, January 17, 2012

Vintage Pattern Photos with Shoulder Pads

Here are some examples of Vintage Pattern Photos that put Shoulder Pads to good use: vintage sweater sleeves
This shape can be supported by a kick-up pad.  If you cannot find this style of shoulder pad consider using shaped sleeve heads or a rolled pad.
vintage knitting tutorial padding
In this pattern photo you can clearly see the edge of the shoulder pad.  It appears to be shaped like modern women's wear 'coat pads'.  It features a steep increase from the inner to outer edge, and lets the sleeve hang straight down below the modest puff.
vintage sweater tutorial on sleeves
A roll or long rectangular pad (see gauge swatch pads) should be used when the sleeve seam sits this far from the neck and the puff extends the shoulder line.
how to pad vintage sweater
The line of this 1950s shoulder is improved by a round pad.  Although the welt features drastic shaping (presumably full fashioned increases) the sleeve and shoulder are very basic.  The pad creates the shape and adds drape to the heavy fabric.  This is the kind of 'figure enhansing' padding that Dior re-introduced.

knit shoulder pads
Another kick-up shape.  Any kick-up shoulder pad, whether it is a pad or layered, angled sleeve head, needs to be customized and carefully placed.  In this case most of the shaping comes from the fabric type and pleating.  The padding supports, rather than creates the shape.
vintage knitting shoulder pads
To support the apex of this folded puff sleeve, a triangular pad or a modern shoulder pad. trimmed to shape should work.  When the shoulder line is extended to this extreme, consider stitching the pad so that the greater portion of padding is free of the shoulder.  Try flipping a triangular pad so that the point sits at the centre of the sleeve to shoulder seam, and that the long side sits at the edge of the shoulder.
wartime knitting sleeves
Without some sort of pad a cardigan or any kind of second layer would flatten a delicately puffed sleeve jumper.  In this example the pad would most likely have been knit as a small rectangular (almost square) pillow, stuffed with fleece or maybe sawdust.  A clever home knitter might have used her gauge squares!
1940s knitting
Remember that a sturdier knit may not require a shoulder pad.  Often, a dense or thick fabric can support it's own puffed up weight, so long as it has been properly gathered or pleated before seaming into the armseye.
1940 shoulder pads in sweater
This pattern photo clearly shows the outline of a shoulder pad.  It is shaped much like todays shaped pads and is a handy reference for padding placement.  It will have been stitched down the centre spine, with small tacking stitches taken at the two side points of the pad, securing it to the front and the back of the sweater.

'For When You're Off Duty ' is an uncommonly accommodating pattern.  The pattern includes direction of a custom shoulder pad.  Despite the dense fabric created by pleating the firm 1x1 ribbing of the sleeve, this elongated shoulder line would not stay aloft without it's padding.

You are reading "The Quest For Puff" ©Morgan Forrester

Up next:
Choosing & Placing Knitted Shoulder Pads
Coming Soon:
Vintage Sleeves: Puff Pleating
Vintage Sleeves: Seaming for Puff
Creating Puffed Sleeves Anew


This post is a part of The Quest For Puff Series. Read it from the beginning HERE.

Monday, January 16, 2012

Shoulder Pads & Puff Sleeved Sweaters

vintage knitting puff sleeves
There's no need to sit like that; a good shoulder pad will keep your puff in place!

There is a lot to cover. First off, I ask that you shove all your preconceptions, jokes, eyeball rolls and Dynasty memories to the back of your mind. We are talking about a different era for starters.
Shoulder pads in the 30s/40s were a very different beast. They were not the Velcro disks that we immediately think of in a post 1980s world.

Shoulder padding falls into 3 main categories (at least for our purposes)
Pads
Sleeve Heads (Shaped and Rolled)
Supports
This is of no help to the home knitter.

Elsa Schiaparelli, perhaps best known to us knitters for her iconic tromp l'oile sweaters, pioneered an unbelievable list of fashion classics, among them the Shoulder Pad. The Schiaparelli shoulder is strongly associated with Hollywood glamour, and all the broadest of faux-broad broads, Crawford, Garbo and Hepburn were fans.  Her look is satirized and honoured in the fashion show segment of The Women (fashions by Adrian) Watch the clip below to see how these extreme silhouettes and shoulder styling are era specific. These pads were often triangles; soft cushions extending width. Her 1930s mainstreaming of adjustable shoulder padding into conventional women's wear ensured that the square shoulder of the 1940s was feminine, rather than a simple diminution of military uniforms and other customs of mens tailoring.


You must click HERE to watch on youtube proper.
Watch on Mute!  This is (clearly) not the original soundtrack.


Shoulder Pads are best suited to structural puff sleeves.  Puffed, or full sleeves that have been folded or pleated into the seam benefit most from this style of padding.  Military, kick-up, and elongated shoulder lines from the late 1930s up until the introduction of the New Look in 1947 were supported by shoulder pads and should be now.  The hand knitter working from patterns in this era would have taken this extra step for granted.

Know which look you're going for by reading Puffed Sleeves in the 1930's and 1940's.

Many Vintage Patterns include directions for knitted pads to be sewn to the inside of the sweater. A good example may be found in the V&A's collection: "For When You're off Duty". This little pad is more like a cushion; knit of jumper yarn (sock yarn is a good substitution) and stuffed to your taste. It rests on the shoulder and supports the apex of the puff. Make your own as you would a cell phone cozy. Two squares or rectangles sewn together, or one folded in half and seamed will do. For a softer, pre-war look, you may choose to make your pad out of two triangles rather than rectangles which have a more masculine feel.

Read 'Using Gauge Swatches as Shoulder Pads in the Vintage Style' for more on knitted padding.
Read 'Choosing & Placing Knitted Shoulder Pads' for further guidance.

Today, ready made shoulder pads may be purchased at most fabric stores. These objects are more like the power suit boosters we are used to. For Knitters' use they will most likely need to be trimmed. For this reason I do not recommend buying vinyl pads. Good companies provide different pads for different sleeve shapes i.e. Raglan, Dolman. The pad is sewn to the garment through the center, creating a spine for the pad. Baste this spine and try on the sweater. Working from the outside, still wearing the sweater, take small stitches with the sweater's yarn (de-plyed if necessary) to anchor the pad in place, or for heavy yarns, sewing thread.
For an extreme vintage look I recommend a "coat pad" (a pad used in coats) with a 1" thickness. For a blouse vs. a sweater a 1/2" thickness may be more appropriate.
The looks which large pads can provide depend entirely on their placement, so a great deal of experimenting will be needed.  It is best to do this while wearing the garment, whenever possible.  If trimming is necessary, use a fabric marker to note cuts while holding the pad on your shoulder (with a friend or a mirror).


This vinyl pad is not what we want.  Note the centre stitching along the pad, attaching it to the shoulder seam.  We do want this.

Ready to wear Shoulder Pads tend to come in white, nude or black. If none are available in an appropriate shade for your project they may be covered. For a nude look try using old nylons to cover a pad.
For an outrageous shoulder la Joan Crawford or House of Balmain, consider layering 2 or more pads. Baste them together through the centre spine, and then cover the pad using loose stitches or feather stitches and cover with fabric or nylons. This is a great technique to use if you can only find 1980s styled flat pads.
American football comments be damned!

Generally these kinds of paddings can be made at home with little sewing experience.  With a reliable sewing store in your area though, you may find it easier to purchase ready-made padding, and then alter it at home.  Pads may be opened up at the seam and the amount of wadding can be adjusted.  You may choose to add or remove bulk, or you may decide to push the stuffing to one side or the other, depending on your sweater style or body type.  If you are layering sleeve heads or pads use large feather stitches.  If you are layering fibrous padding stuffs, experiment with spray adhesives.  If a large shoulder pad's slope is to wide for your shoulder or if you have a petite shoulder line, cut your pad in half.  Trim as necessary, adjust the angle on your own shoulder, and then reattach the front and back of the pad using a baseball stitch.  Remember that few bodies are symmetrical, so treat each pad, each knitted piece, and each shoulder separately.

Click HERE to see examples of Vintage Sweater Pattern Photos that put Shoulder Pads to good use.

You are reading "The Quest For Puff" ©Morgan Forrester

Up next:
Choosing & Placing Knitted Shoulder Pads
Coming Soon:
Vintage Sleeves: Puff Pleating
Vintage Sleeves: Seaming for Puff
Creating Puffed Sleeves Anew


This post is a part of The Quest For Puff Series. Read it from the beginning HERE.

Thursday, January 12, 2012

WWI Red Cross Sleeveless Sweater

RED CROSS TELLS HOW TO KNIT FOR SOLDIERS

WASHINGTON, September 22- [1917]
Here's how to knit a sleeveless sweater for a soldier, according to official Red Cross instructions:

Get two and a half hanks of yarn.
Also one pair of Red Cross needles No. 3.

Cast on 80 stitches.
Knit 2, purl 2 stitches for 4 inches.
Knit plain until sweater measures 25 inches.
Knit 28 stitches, bind off 24 stitches for neck, loose.
Knit 28 stitches.
Knit 7 ridges on each shoulder, cast on 24 stitches.
Knit plain for 21 inches.
Purl 2, knit 2 stitches for 4 inches.
Sew up sides, leaving 9 inches for armholes.

Now if you are still interested in going further with the war knitting brigade, go to your local Red Cross chapter and ask for one of the official knitting circulars.

Five hundred thousand of these circulars have been sent to local chapters everywhere by the Red Cross.

Each contains full information on how to knit the wight standardized articles: Sleeveless sweaters, mufflers, helmets, socks, wristlets, wash cloths, bed socks and bottle covers.

Recent cables from Major Murphy, Red Cross commissioner with the American boys in France, emphasized the need for the warm knitted articles for the soldiers who face the hardships of winter in the trenches.

Army officers request that these articles be forwarded to France as soon as possible. The severity of winter on the battlefields and a rising tuberculosis rate to combat the demand, they warn, that several million of these articles reach France before Thanksgiving.
Socks, [unreadable word] knitters are warned that knots ridges or lumps must be avoided, as they blister the feet.

-Berkeley Daily Gazette, September 22, 1917

Note: I have altered the original typesetting for readability.

A Little Modern Help From Morgan:

There was no illustration or schematic in this newspaper article, but basically this is a sweater knitted flat, in one piece. Today, North Americans would call it a vest.

"Get two hanks of yarn" is kind of hilarious, but remember that the Red Cross had depots in most cities providing official yarn to be used with their official patterns.
If you were to chose a modern Double Knitting or Worsted Weight yarn, these are the sizes you could achieve.
At 5 stitches to the inch the sweater would measure 32" at the chest.
At 4.5 stitches to the inch the sweater would measure 35" at the chest.
At 4 stitches to the inch the sweater would measure 40" at the chest.

There is a reason why the Red Cross did not provide gauge or desired sizes.
They had discovered, in wars passed, that there was no point!
They found that one set of instructions and materials could provide many different results, and conveniently, a bevy of sizes!

The sweater is knit in garter stitch with a ribbed waist. It is knit from the front (or back, I suppose) upwards, to a neck created by casting off the centre 24 stitches.
Two shoulders will be worked either side of this cast off, so new yarn will have to be attached to work the first shoulder (the shoulder located at the beginning of the neck cast off row).
Work one shoulder, and once the 7 ridges are knit ('ridges' refers to the effect created by 2 rows of plain knit in garter stitch) you will place those 28 stitches on waste yarn or a holder.
The casting on of 24 stitches replaces the centre 24 stitches cast off, connects the two shoulders, and creates the neck of the sweater.

The remainder of the pattern echos the beginning of the pattern, as you work the 2nd side from the neck down to the waist, ending the project with the second half of the waist ribbing.
I would suggest using a mattress stitch to sew the sides of the sweater together seamlessly, remembering to end the stitching at the desired underarm location (9" from the shoulder if you are sending this to the 1917 Red Cross!)

Let me know how it goes!

Friday, January 06, 2012

Sunday, January 01, 2012

Shoulder Pad Intro


Peggy Cummings in 1950's Gun Crazy
Shoulder Pads: You Don't Gotta Love Em. I do. It's a compulsion. I love their various forms, their little ways and quirks. I love that shoulder pads can be used in more than one way, regardless of their shape, and that subtle shifts in their placement can result in very, very different fits and effects. For these posts we'll assume that we're going for a full-on vintage look from the 1930s, 1940s or '50s. That said, we can do things authentically (the way these jumpers would have been made and worn in real life) or we can mimic the ideal modeled in the pattern (or an ironic exaggeration of the look). It's easy to switch between the two goals.

It is also important to note that the way we remember things isn't always the way they really were, especially if like me, you have no business remembering 1930. The way we romanticize an era gradually changes the way it is remembered, and soon a few singular looks or trends come to represent a period. We cannot help but bunch these into decades, and in time the handful of looks and ideas which we now associate with periods like the 1960s or 1970s will be whittled down to one image as it has been in preceding decades. Look back beyond the turn of the 20th century and the average person will have one outfit which they associate with each century. What on earth will come to represent our current time? Well this is a completely different topic now...

I guess I was trying to point out that the look a knitter is looking for within the patterns of a period may not even exist within those years. It may only have existed in the Hollywood send-ups of period films and costume dramas, or the time-machine fantasies of fashionistas. That does not mean, however, that the look can't be achieved. This is another reason to experiment with padding. A cleverly chosen shoulder pad, well appointed, can change an everyday and historically accurate sweater pattern into the imagined silhouette of any fashion fantasist.
A variety of garment shoulder pads available at diytrade.com
A shoulder pad is not an accessory for a jacket or sweater; it is part of the internal structure of a well constructed garment.
Also, pads are not the whole padding story.  There are many ways in which the home knitter can support a full or puffed shoulder.  Shoulder pads are just the most familiar tool in a post-1980s tool box.  A vintage-enthused knitter should acquaint herself with all forms of padding before completing her puffed look.
Learn about your shoulder pad-ding options here.

You are reading "The Quest For Puff" ©Morgan Forrester

Up next:
Coming Soon:
Vintage Sleeves: Puff Pleating
Vintage Sleeves: Seaming for Puff
Creating Puffed Sleeves Anew

This post is a part of The Quest For Puff Series. Read it from the beginning HERE.