Before Emma Jacobsson became the knitting heroine of Sweden with her Bohus Stickning co-op, the Grand Dame of Swedish knitting was the 17th century Dane, Magna Brita Cracau. The techniques she brought to Halland created a legacy of knitwear that would directly influence those of Norway and the British Isles.
Halland sweaters became stranded in the 19th century as documented in the fantastic "Swedish Sweaters, New Designs from Historical Examples" by Britt-Marie Christoffersson. I used this book as well as Knitting in the Old Way, Designs & Techniques from Ethnic Sweaters", Roberts & Robson to experiment with all of the area's signature techniques.
My sweater is primarily in the Ullared style. I used traditional diamond patterns with a typically placed record of the year and my initials. These sweaters bore the wearers rather than the makers initials, in this case they are one in the same. I also followed the oldest tradition of finishing using crochet to work the neck and cuff edges.
Using assorted geometric patterns from "Swedish Sweaters" I inserted 'false seam lines' using colour to line up the circular knitting with the point at which the front and back began to be worked flat. I also made half gussets following Plan 1 for the Danish Blouse in Knitting in the Old Way and patterned them separately.
The main adjustments I made were to change the shape of the sweater to the Danish cropped style, or the Swedish Spedetroja look. I also started with a split welt hem. I don't suit a big boxy sweater.
Using worsted weight wool is a major modernization along with the use of red yarn. Traditionally, these (and most Swedish) sweaters would have been knit in black and white and then dyed red.
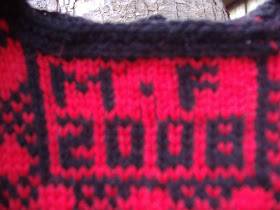
You see, I had to post this before it was too late!
Wednesday, December 31, 2008
Saturday, December 20, 2008
Victorian Spinning?
I love my Louet Victoria spinning wheel, but wish that there were bulky attachments available. A larger orifice and wider flyer would be at the top of my christmas list. In the mean time...
I hope Santa knows his spinning terms.
ps Happy Birthday, Chris.
I hope Santa knows his spinning terms.
ps Happy Birthday, Chris.
Wednesday, December 17, 2008
Sunday, December 07, 2008
Keith's Bottle Cap Trivet
How about a few simple acts of green in one go. Liberated Bottle Caps and selvaged ends of yarn combine to create a functional and zakka trivet. A trivet is a coaster that helps retain heat while it's main purpose is to keep your table top clean and safe. So reuse, recycle, and reduce the number of times you need to zap your tea or soup in the microwave with this free pattern.
Keith's Bottle Cap Trivet
©Morgan Forrester, 2008
Materials:
14 Bottle caps without dents
Small amounts of yarn and cotton. I used vintage scraps which are equivalent to:
No. 10 Crochet Cotton
DMC Embroidery Floss
Fingering weight wool.
To get a vintagey colour palate, try tea dying white, cream and baby blue. Tutorial here.
1.00mm crochet hook (larger for heavier wool)
Darning needle. -I love Chibi needles for their bent tip.
Pattern:
ch 10, sl st to form ring. (Do not opt for magic loop)
ch 4, tc in next ch st, *2 tc in each ch st* around. (20 tc) sl st in 4th ch to join.
Begin creating the pocket for your Bottle cap by double crocheting in each tc BUT do not complete the stitch -leave each dc on the hook. Your hook will only accommodate so many stitches. When this happens, simply yarn over and pull through all loops left on the hook. This will rapidly decrease the number of stitches on the next round. Join beg and end of the round with a slip stitch.
If you find this a bit tricky, you may try the following after the tc row:
ch 3, dc in each tc, sl st in 3rd ch to join,
This is a good time to insert your Bottle cap.
ch 1, sc2tog in each dc, sl st to join.
Rep this last row until a small opening remains no matter which decrease method you use(number of rounds will depend on gauge). If you look closely, you'll see that I used both methods project.
You may choose to leave this open; the Bottle cap is secure.
To close, sc3tog as possible, then tie off leaving a long tail. Thread this tail on a needle and sew close. Snip, but keep your tails!
Simple sewing attaches the Bottle caps together. When connecting two colours, sew with the tail of the lighter colour unless it is cream/white. White stitches stand out too clearly.
My trivet is a simple shape, but that means that little fibs really show up. Here's how I would connect the caps if I were being a fussbudget. This technique is a good one when dealing with crochet motifs in general.Rep this last row until a small opening remains no matter which decrease method you use(number of rounds will depend on gauge). If you look closely, you'll see that I used both methods project.
You may choose to leave this open; the Bottle cap is secure.
To close, sc3tog as possible, then tie off leaving a long tail. Thread this tail on a needle and sew close. Snip, but keep your tails!
Simple sewing attaches the Bottle caps together. When connecting two colours, sew with the tail of the lighter colour unless it is cream/white. White stitches stand out too clearly.
Trace your caps onto brown paper in the following pattern. A vertical row of:
2, 3, 4, 3, 2
Assign your colours and note them.
Attach the caps in vertical rows. Next sew the rows of 2 to the rows of 3, and then connect the rows of 3 to the middle, 4 cap row.